Cleaning

Restoring the Shine on a Travertine Floor Tiles in Haughley

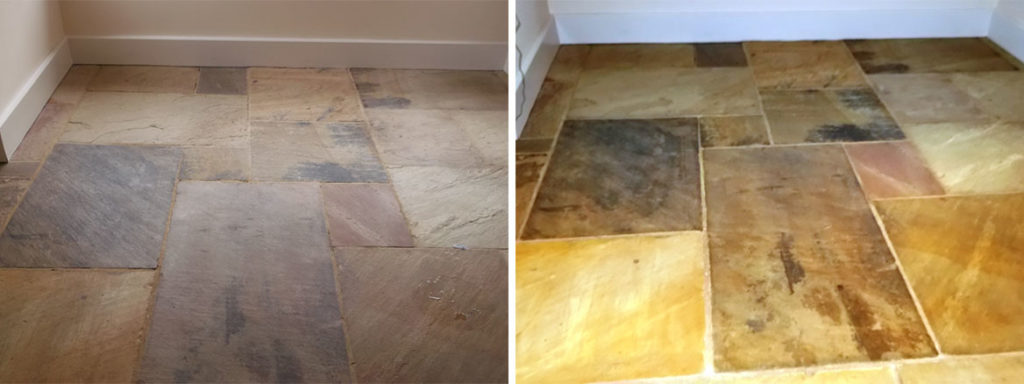
This travertine tiled floor was in a converted Chapel in the Suffolk village of Haughley. The floor had been laid about 4 years previous as part of the conversion. The owner has been applying sealer to the floor but was finding it difficult to keep clean and as you can see from the photographs it had become dull and lost its shine.

Travertine Tiled Floor Before Travertine Tiled Floor Before

Cleaning Travertine Floor Tile

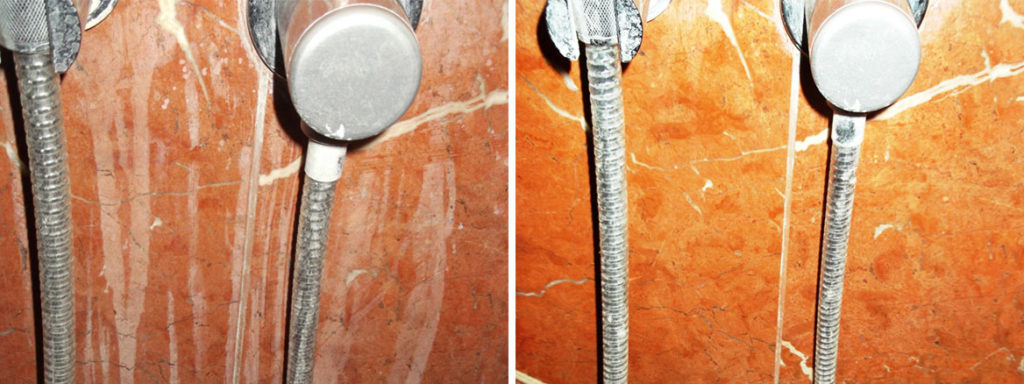
The Travertine floor tiles were cleaned and polished using a set of diamond encrusted Twister burnishing pads. They really are the best solution for restoring hard floor surfaces such as Travertine, Limestone and Marble. We started with the red pad to remove the existing sealer followed by the white and yellow pads to clean and hone the stone. The wall and floor tiles were then rinsed with water to clean and neutralise the floor ready for sealing; this work had taken much of the day so we left the floor to dry overnight.

Sealing Travertine Floor Tile

We came back the next day to complete the floor starting by adding a final polish using a Green burnishing pad. The last step was to seal using three coats of Tile Doctor Colour Grow which provides stain protection as well as enhancing the colour in natural stone surfaces; a five litre bottle of sealer was required to cover this 45m2 kitchen floor.

Travertine Tiled Floor After Travertine Tiled Floor After

I’m happy to report our efforts restored the shine on this floor and the owner now finds it much easier to maintain.

Travertine Tiled Floor in Suffolk Cleaned and Sealed

Restoring the Shine on a Travertine Floor Tiles in Haughley Read More »

Marble Shower Cubicle Before After Cleaning

Marble Tiled Wet Room in Great Bricett, Suffolk

Details below of a wet room lined with 10m2 of Marble in old cottage on the outskirts of the medieval village of Great Bricett in the heart of Suffolk. You can see from the photographs staining of the Marble Tiled wall and floor which was left in a mess after a friend of the family had tried to remove the limescale during a visit.

Marble Shower Cubicle Before Cleaning Marble Shower Cubicle Before Cleaning

Cleaning and Sealing Marble Tile

The Marble tiles were cleaned and polished using a set of mini Twister burnishing pads. The pads are encrusted in diamonds are brilliant at restoring hard stone surfaces such as Marble. You start with the red pad to remove the existing sealer followed by the white and yellow pads to clean and hone the stone. The wall and floor tiles were then rinsed with water to clean and neutralise the floor ready for sealing.

The room had under floor heating which helped to dry out the tile and so it was soon possible to use the final green pad to polish the tiles and move onto sealing. To seal we used two coats of Tile Doctor Colour Grow which is a colour intensifying breathable sealer that enhances colour as well as providing durable surface protection, a one litre bottle of sealer was sufficient.

Thanks to the under floor heating we managed to complete the job in a single day and as you can see from the final set of photographs below the stains have been removed and the tiles restored to their original appearance.

Marble Shower Cubicle After Cleaning Marble Shower Cubicle After Cleaning


Limescale removed from Marble Tiled Shower in Suffolk

Marble Tiled Wet Room in Great Bricett, Suffolk Read More »

Burford Limestone Before After

Cleaning Burford Limestone Tiles in Rendham, Suffolk

These Burford Limestone tiles were in an old farmhouse in the village of Rendham in Suffolk. We were called in because the floor had only been laid less than a year prior and it was proving extremely difficult to keep clean. In fact you should be able to see from the photographs a number of stubborn lines and staining.

Burford Limestone Before Burford Limestone Before

Cleaning and Sealing Limestone Tile

To thoroughly clean the Limestone tile we applied Tile Doctor Pro-Clean which is a strong alkaline cleaning agent; it’s important to use an alkaline cleaner as even weak acidic products will harm natural stone with continued use. We used 5 litres of Pro-Clean in total, leaving it to dwell on the surface of the tile for a few minutes before actively scrubbing the floor with a rotary machine fitted with a black scrubbing pad. The scrubbing process works the solution into the surface of the tile to release the dirt. The Limestone floor was then rinsed thoroughly with water to clean and neutralise the floor and wash away any remaining cleaning fluid ready for sealing; a wet Vacuum machine really helps at this stage to suck up the water from the floor.

We let the floor dry overnight and were back the next day to start the sealing process. To seal the floor we used three coats of Tile Doctor Colour Grow which is a colour intensifying breathable sealer that enhances colour as well as providing durable surface protection, two litres of Colour Grow was required to cover the 25m2 area of Limestone with three coats of sealer.

You can see from the photographs the improvement in the floor, plus its now a lot easier to clean.

Burford Limestone After Burford Limestone After


Burford Limestone cleaned and sealed in Suffolk

Cleaning Burford Limestone Tiles in Rendham, Suffolk Read More »

Marble Hallway Before After Polishing

Marble Tiled Hallway in Woodbridge, Suffolk

This Marble tiled floor was in the hallway of a house in the historic town of Woodbridge; the floor had lost its lustre was looking dull and in need of a good polish.

Marble Hallway Before Polishing Marble Hallway Before Polishing

Marble Cleaning and Sealing

It took a day to clean the Marble tiles using a set of 17 inch diamond encrusted Twister burnishing pads fitted to a buffing machine. The pads come in a set of four and you start with the red pad in conjunction with water to remove the existing sealer followed by the white and yellow pads also with water to clean and hone the stone. The tiles were then rinsed with clean water to clean and neutralise the floor ready for sealing.

Once the floor was dry we used the final green pad with a small amount of water to polish the tiles before moving onto sealing. To seal we used two coats of Tile Doctor Colour Grow which does what it says on the tin and enhances colour as well as providing that important surface protection, a five litre bottle of sealer was required to provide two coats on this 35m2 floor.

I’m not the world’s best photographer but hopefully you agree from the pictures on this page that the floor has now got its shine back.

Marble Hallway After Clean and Polish Marble Hallway After Clean and Polish

Marble Tiled Hallway polished in Suffolk

Marble Tiled Hallway in Woodbridge, Suffolk Read More »

Victorian Floor Before After Cleaning

Victorian Quarry Tiled Floor Restoration

This original Victorian quarry tiled floor was laid in the hallway of an old 1897 cottage dating back to built in the Norwich village of Great Melton. The owner was able to show me pictures from the early 1900s showing the then owner and the floor. It had been covered by carpet for several years and was covered in paint and other debris from the renovation work being carried out.

Victorian Floor Before Cleaning

Cleaning the Victorian Quarry Tiled Floor

You can see from the pictures above that the floor was in quite a state and it took a day to whole day to clean. The floor area was only around 6m2 but consumed two litres of Tile Doctor Remove & Go which is a very strong tiled floor stripper that will just about shift anything and a further 2 litres of Tile Doctor Pro-Clean getting it clean. Once that was done we washed down the floor to neutralise the floor and left it to dry so it could be sealed the next day

Victorian Floor Before Cleaning

Sealing the Victorian Quarry Tiled Floor

We returned the next day to seal the floor, for this we used four coats of Tile Doctor Seal and Go which gives a nice low sheen finish and is recommended for these types of floor, one litre of sealer was sufficient to do the job. You can see a huge improvement from the photographs which clearly show a stunning transformation.

Victorian Floor After Cleaning and Sealing Victorian Floor After Cleaning and Sealing


Victorian Quarry Tiled Floor Restoration

Victorian Quarry Tiled Floor Restoration Read More »

Sandstone floor before after sealing

Sandstone Tile Cleaning in Beyton

We were called into Clean and Seal 36m2 of Sandstone tile flooring installed in the Kitchen, Utility, Hallway and Cloakroom of a house in the Suffolk village of Beyton. The sandstone floor tile was laid around 10 years prior, the tiles had never been sealed and despite regular cleaning the riven surface had become a natural home for dust and grime.

Sandstone Tile Cleaning

Cleaning the floor was straight forward using a dilution of Tile Doctor Pro-Clean which is a very effective and flexible cleaning product recommended for natural stone surfaces, it was a large area so we used around 5 litres in total. We washed the floor down with clean water to remove any remaining product and then left it to dry over night.

Sandstone floor before sealing Sandstone floor before sealing

Sealing Sandstone Tile

The sandstone tile sealer we chose for the floor was Tile Doctor Colour Grow, it leaves a matt finish as opposed to a shiny polished effect but it does bring out the colour in the Sandstone tile, we used around 5 litres of sealer to complete the floor.

Sandstone floor after cleaning and sealing Sandstone floor after cleaning and sealing


Cleaning and Sealing Sandstone Tile Floor

Sandstone Tile Cleaning in Beyton Read More »

Ceramic Tiled Floor Cleaning

Ceramic Tile Cleaning in Newmarket

This ceramic tiled floor had only been laid in a Kitchen floor in Newmarket just over a year ago. The tiles from the Topps Tiles Padova range did not have a glazed finish to them and therefore the owner was having difficulty keeping them clean on a daily basis. I did a quick search on the Internet and it seems this range of tiles are difficult to remove grout smears from once laid.

The floor was cleaned using Tile Doctor Pro-clean diluted with 3 parts water to effectively clean the floor and grout removing the ingrained dirt that had accumulated. The tiled floor was 14m2 and required 2 litres of Pro-Clean to get it clean. The photo below clearly demonstrates the improvement in the two tiles which were cleaned before moving onto the rest.

Ceramic Tiled Floor Cleaning

We washed the floor down with water to neutralise it and then left to dry for a few hours before sealing it with two coats of Seal & Go which on this size of floor required one litre of product. Normally ceramic tiles won’t take a sealer due to the glazing however in this case a sealer will be necessary to protect the floor.

Ceramic Tile Cleaning in Newmarket

Ceramic Tile Cleaning in Newmarket Read More »

Quarry Tiled Floor Before After Restoration

Quarry tiled floor restoration in Ipswich

This old quarry tiled floor was in the dining room of a Victorian terrace house in central Ipswich, Suffolk. The tiled floor had been covered by carpet for the previous 12 years and the owner wanted it restoring back to its original condition.

Quarry Tile Cleaning

Quarry Tiled Floor Before Restoration Quarry Tiled Floor Before Restoration

The carpet backing had been glued to the quarry tiled floor and it took two days of hard graft using 2 litres of Remove & Go to remove the backing followed by 2 litres of Pro-Clean to clean up the tile. Once we had finished cleaning we washed down the floor to remove any remaining cleaning products and left it to dry overnight. We find a Wet and Dry Vacuum helps a lot when doing this; it’s a great tool for removing liquids from floors.

Quarry Tile Sealing

Quarry Tiled Floor After Restoration
We came back the next day and sealed the floor with five coats of Seal & Go, about 1 litre, which brought out the beauty in the floor, you can see the remarkable difference in the photographs.

Quarry Tile Floor Restoration in Ipswich

Quarry tiled floor restoration in Ipswich Read More »

Quarry tiled floor before after

Diamond Laid Quary Tile Floor Restoration

Quarry Tile Floor in Bury St Edmunds

This 10m2 old quarry tiled floor laid in diamond pattern was in the hallway of a lovely thatched cottage, once part of the Hengrave Hall estate, had not been sealed for several years and was in need of restoration. Hengrave Hall itself is a Tudor mansion, located just north of Bury St Edmunds and in the heart of the picturesque village of Hengrave. It’s an imposing country mansion with beautiful gardens and offers a perfect venue for Weddings.

Quarry Tiled Floor Before Restoration Quarry Tiled Floor Before Restoration
Quarry Tiled Floor Before Restoration

Cleaning the Quarry Tiled Floor

The floor was given a thorough clean using a litre of Tile Doctor Pro-clean which is a concentrated, multi-purpose high-alkaline cleaner, stripper and degreaser designed for use on Quarry Tiles and then left to dry overnight ready for sealing the next day.

Quarry Tiled Floor After Restoration Quarry Tiled Floor After Restoration
Quarry Tiled Floor After Restoration

Sealing the Quarry Tiled Floor

The next day we sealed the floor using 5 coats of Tile Doctor Seal & Go which provides both a stain resistant surface seal and a durable low-sheen finish; we found 1 litre of the product was sufficient for the job.

Quarry Tile Floor Restoration in Bury St Edmunds, Suffolk

Diamond Laid Quary Tile Floor Restoration Read More »

Scroll to Top