Woodbridge

Terracotta Floor Tile Floor Cleaning Sealing Woodbridge

Terracotta Tiled Floor Renovation in Woodbridge

This Terracotta tiled floor was in the kitchen of a house in the river side town of Woodbridge. The client had inherited the property and was looking to freshen it up prior to selling. The house had terracotta floors in nearly every room on the ground floor including a cellar, some areas of which were showing signs of damp.

Terracotta Tiled Floor Before Cleaning Woodbridge

After visiting the property, I could see the terracotta clearly hadn’t been sealed for some time as the dirt was well ingrained into the pores of the tile and it would need a deep clean to get it all out. After carrying out a few tests I was able to come up with a renovation plan and produce a quote for the work. Happy to proceed we agreed a date for the work to begin which would take four days.
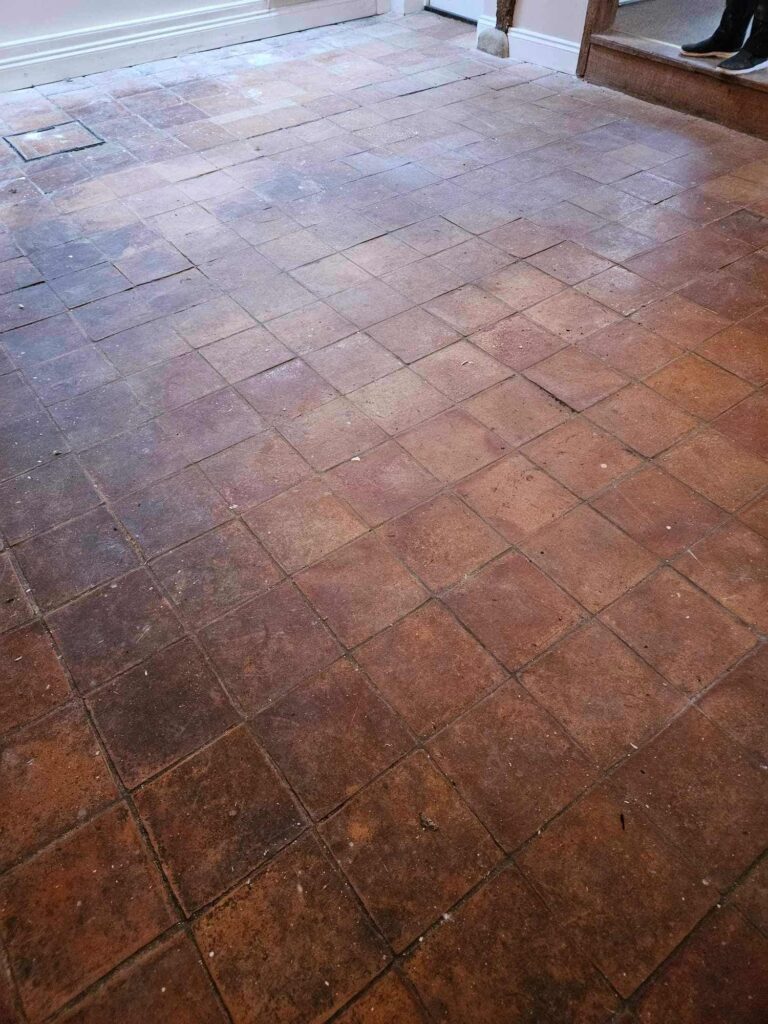
Terracotta Tiled Floor Before Cleaning Woodbridge

Cleaning a Terracotta Tiled Ground Floor

To get the floor clean I started with a strong dilution of Tile Doctor Pro-Clean, which was applied to the tiles and left to soak in for ten minutes. The dwell time gives the product time to break down the soiling before scrubbing. The product was then worked into the tile and grout using a Black pad fitted to a rotary floor machine.

The grout was also scrubbed by hand using our wire brushes to get it as clean as it could be. All the soils released from the tile were rinsed away with water and then extracted using a wet vacuum. Most of the floors were quite dirty so after inspecting the floor they were re-treated until we were satisfied. Five litres of Tile Doctor Pro-Clean were used in the process.

The damp areas were treated to an acid wash using a product called Tile Doctor Acid Gel, this neutralises any alkaline efflorescence that may have built up in the floor. The gel was brushed into the floor and then the resultant slurry removed by rinsing and the wet vacuum as before.

Sealing a Terracotta Tiled Ground Floor

The floors were then left to dry out over a weekend, and we then returned the following week to apply a sealer. Before doing so several moisture readings were taken with a damp meter to make sure the floor was dry. The readings were satisfactory, so the floors were then sealed with Tile Doctor Colour Grow, which is a breathable impregnating sealer. There were several floors to do and with Terracotta being quite porous five litres of sealer were needed for this.

Terracotta Tiled Floor After Cleaning Sealing Woodbridge

The client was happy that we had managed to get the floors looking so good. We left a free bottle of Tile Doctor Neutral Cleaner for the client to use to maintain their floor. This should keep it looking good and the property now looked much more appealing to a potential purchaser.

Terracotta Tiled Floor After Cleaning Sealing Woodbridge


Professional Restoration of a Terracotta Tiled Ground Floor in Suffolk

Terracotta Tiled Floor Renovation in Woodbridge Read More »

Terracotta Kitchen Floor Tile and Grout Renovated in Hoo Woodbridge

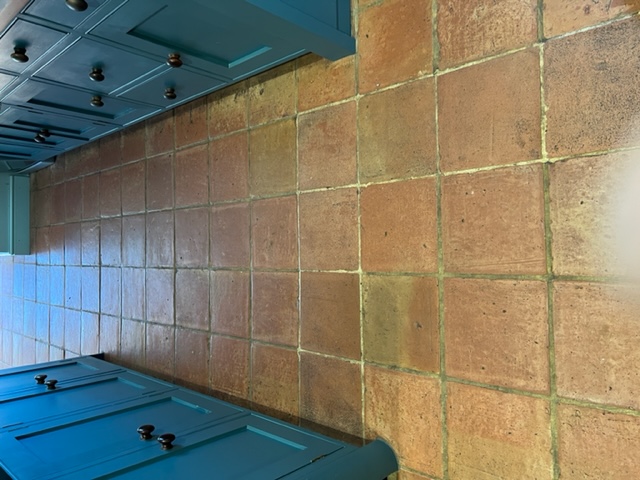
Terracotta Tiled Kitchen Floor Renovated in Hoo Woodbridge

This Terracotta tiled kitchen floor at a house in the small hamlet of Hoo near Woodbridge is a great example of an unmaintained floor. Terracotta is a very porous material and will easily absorb fluids and dirt if left unprotected and by unprotected, I mean sealed. Sealers prevent dirt from becoming ingrained in the pores of the tile however they do wear off over time and once that happens, they become very difficult to keep clean. The same thing happens with the top layer of grout and so it’s important to maintain the sealer on both the tile and grout especially in a kitchen environment where spills and therefore staining is more likely to occur.

Terracotta Tiled Kitchen Floor Before Renovation Hoo Woodbridge

I visited the property to survey the Terracotta floor and I could see the whole floor, including the grout, needed a deep clean and application of a fresh sealer. Due to its size and the logistics of furniture moving I could see it would need to be done in two halves. I explained the process and conducted a small demonstration so they could see the results. Happy to proceed with my renovation plan we scheduled a date for the work to be done a few weeks later.

Terracotta Tiled Kitchen Floor Before Renovation Hoo Woodbridge

Cleaning a Terracotta Tiled Kitchen Floor

Cleaning started with the spraying the Terracotta floor with a strong dilution of Tile Doctor Pro-Clean. After sprayed onto the tiles and grout it is then then left to soak in for around ten minutes. Normally I would use a stronger product to remove a sealer but when a lot of it has been worn off anyway, I find a strong dilution of Tile Doctor Pro-Clean does the job.

The floor was then scrubbed using a rotary machine fitted with a black scrubbing pad. This process took some time and in all, five litres of Pro-Clean was consumed in the cleaning process to remove the many years of dirt that had built up in the floor. A wet vacuum was then used to remove the soiling and water used to rinse the floor after scrubbing. Pro-Clean is an alkaline product so it is a good idea to give the floor a good rinse following its use to neutralise the pH of the floor after cleaning.

Sealing a Terracotta Tiled Kitchen Floor

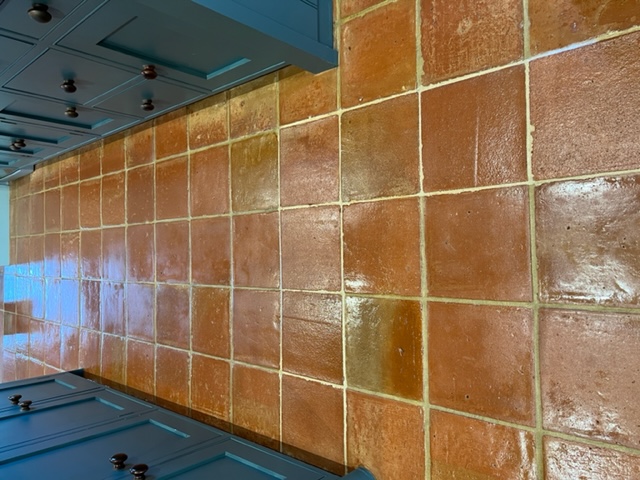
The floor was left to dry out overnight and after checking moisture levels the following day it was sealed with five coats of Tile Doctor Seal & Go which is a water-based sealer that adds a subtle sheen finish. With it being such a large area, it took five litres of sealer to seal both areas and in total we spent four days at the property.

Terracotta Tiled Kitchen Floor After Renovation Hoo Woodbridge

For maintenance cleaning I recommended Tile Doctor Neutral Tile Cleaner which is a pH neutral tile cleaning product but can be used daily if required. It’s a mild cleaning product that won’t strip the tiles of the newly applied sealer like many strong household cleaners can. It’s a concentrated cleaner that has a nice fragrance and being concentrated a small amount goes along way so a bottle should last a while.

Terracotta Tiled Kitchen Floor After Renovation Hoo Woodbridge

The floor now has a nice, easy to maintain sheen which should last for many years to come.


Professional Restoration of a Terracotta Tiled Kitchen Floor in Suffolk

Terracotta Tiled Kitchen Floor Renovated in Hoo Woodbridge Read More »

Marble Hallway Before After Polishing

Marble Tiled Hallway in Woodbridge, Suffolk

This Marble tiled floor was in the hallway of a house in the historic town of Woodbridge; the floor had lost its lustre was looking dull and in need of a good polish.

Marble Hallway Before Polishing Marble Hallway Before Polishing

Marble Cleaning and Sealing

It took a day to clean the Marble tiles using a set of 17 inch diamond encrusted Twister burnishing pads fitted to a buffing machine. The pads come in a set of four and you start with the red pad in conjunction with water to remove the existing sealer followed by the white and yellow pads also with water to clean and hone the stone. The tiles were then rinsed with clean water to clean and neutralise the floor ready for sealing.

Once the floor was dry we used the final green pad with a small amount of water to polish the tiles before moving onto sealing. To seal we used two coats of Tile Doctor Colour Grow which does what it says on the tin and enhances colour as well as providing that important surface protection, a five litre bottle of sealer was required to provide two coats on this 35m2 floor.

I’m not the world’s best photographer but hopefully you agree from the pictures on this page that the floor has now got its shine back.

Marble Hallway After Clean and Polish Marble Hallway After Clean and Polish

Marble Tiled Hallway polished in Suffolk

Marble Tiled Hallway in Woodbridge, Suffolk Read More »

Scroll to Top