Colour Grow

Flood Damaged Brick Floor Renovation Needham Market

Renovating a Flood Damaged Brick Tiled Floor in Needham Market

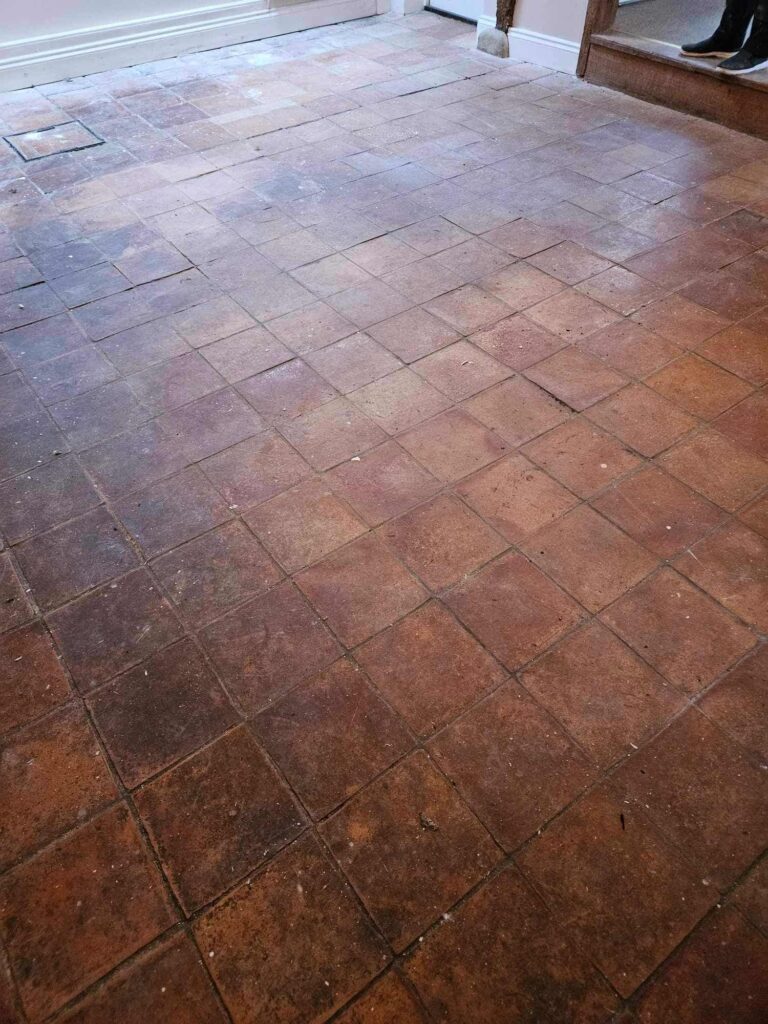
This Brick tiled floor was in an old timber framed house just outside the village of Needham Market. The customer had been flooded from Storm Babet in 2023 which impacted over 750 properties in Suffolk. It was now April 2025 and it had taken the house that long to dry out. The brick floor was now monochrome with ingrained with dirt and almost unrecognisable.

Brick Tiled Floor Before Cleaning Needham Market

I visited the property to survey the floor and recommended the bricks were given and intensive deep clean to remove all the dirt and then sealed with a colour enhancing sealer that would put the life back in the floor. I worked out a detailed quote for the work which was accepted and a date set of the work to start.

Brick Tiled Floor Before Cleaning Needham Market

Cleaning a Brick Tiled Kitchen Floor

To remove the ingrained dirt the floor was sprayed with a strong dilution of Tile Doctor Remove & Go which was left to soak in for ten minutes. This gives the solution time to break down the dirt and contaminates in the brick. The floor was then scrubbed with a rotary buffer fitted with a Silicone Carbide brush, this action works the solution into the brick and lifts the dirt to the surface where it was extracted with a wet vacuum.

The next step was to give the floor an acid wash with Tile Doctor Acid Gel to dissolve any efflorescent salts left in the brick by the flooding. This product is also a good cleaner and will remove other contaminates from the brick such as mineral deposits and rust stains. Finally, it will neutralise the floor after the use of Remove and Go which is a strong alkaline. The gel was brushed into the floor, left to soak in for ten minutes as before but this time worked into the floor with a 120 wire pad fitted to a rotary machine.

The floor was then inspected and spot cleaning carried out where needed including a further clean of the grout which was scrubbed by hand using wire brushes. The slurry was then rinsed off with water and extracted using the wet vacuum. The floor was then given a final rinse by hand with cloths.

Sealing a Brick Tiled Kitchen Floor

The floor was left to dry out thoroughly and when we returned tested with a damp meter to ensure it was ready to be sealed. Happy the floor was dry the sealer was applied for which we had chosen Tile Doctor Colour Grow. This product contains a colour enhancing formula and works by soaking into the pores of the brick to occupy the pores and prevent dirt from becoming ingrained there, this ensures soiling remains on the surface where it can be easily cleaned away. Colour Grow is also fully breathable so any moisture still in the brick will not be prevented from evaporating at the surface.

Brick Tiled Floor After Renovation Needham Market

The process went very well and the customer was thrilled that we had managed to get the floor looking like new again. The new sealer will also ensure it nice and easy to maintain and we left a complimentary bottle of Tile Doctor Neutral Tile Cleaner to get them started. This is a mild, ph neutral tile cleaner that is safe to use on sealed floors, we recommend this as many of the products you find in supermarkets are simply too strong and will strip off the sealer with repeated use.

Brick Tiled Floor After Renovation Needham Market


Professional Restoration of a Flood Stained Brick Tiled Floor in Suffolk

Renovating a Flood Damaged Brick Tiled Floor in Needham Market Read More »

Terracotta Floor Tile Floor Cleaning Sealing Woodbridge

Terracotta Tiled Floor Renovation in Woodbridge

This Terracotta tiled floor was in the kitchen of a house in the river side town of Woodbridge. The client had inherited the property and was looking to freshen it up prior to selling. The house had terracotta floors in nearly every room on the ground floor including a cellar, some areas of which were showing signs of damp.

Terracotta Tiled Floor Before Cleaning Woodbridge

After visiting the property, I could see the terracotta clearly hadn’t been sealed for some time as the dirt was well ingrained into the pores of the tile and it would need a deep clean to get it all out. After carrying out a few tests I was able to come up with a renovation plan and produce a quote for the work. Happy to proceed we agreed a date for the work to begin which would take four days.

Terracotta Tiled Floor Before Cleaning Woodbridge

Cleaning a Terracotta Tiled Ground Floor

To get the floor clean I started with a strong dilution of Tile Doctor Pro-Clean, which was applied to the tiles and left to soak in for ten minutes. The dwell time gives the product time to break down the soiling before scrubbing. The product was then worked into the tile and grout using a Black pad fitted to a rotary floor machine.

The grout was also scrubbed by hand using our wire brushes to get it as clean as it could be. All the soils released from the tile were rinsed away with water and then extracted using a wet vacuum. Most of the floors were quite dirty so after inspecting the floor they were re-treated until we were satisfied. Five litres of Tile Doctor Pro-Clean were used in the process.

The damp areas were treated to an acid wash using a product called Tile Doctor Acid Gel, this neutralises any alkaline efflorescence that may have built up in the floor. The gel was brushed into the floor and then the resultant slurry removed by rinsing and the wet vacuum as before.

Sealing a Terracotta Tiled Ground Floor

The floors were then left to dry out over a weekend, and we then returned the following week to apply a sealer. Before doing so several moisture readings were taken with a damp meter to make sure the floor was dry. The readings were satisfactory, so the floors were then sealed with Tile Doctor Colour Grow, which is a breathable impregnating sealer. There were several floors to do and with Terracotta being quite porous five litres of sealer were needed for this.

Terracotta Tiled Floor After Cleaning Sealing Woodbridge

The client was happy that we had managed to get the floors looking so good. We left a free bottle of Tile Doctor Neutral Cleaner for the client to use to maintain their floor. This should keep it looking good and the property now looked much more appealing to a potential purchaser.

Terracotta Tiled Floor After Cleaning Sealing Woodbridge


Professional Restoration of a Terracotta Tiled Ground Floor in Suffolk

Terracotta Tiled Floor Renovation in Woodbridge Read More »

Limestone Tiled Kitchen Floor Renovated in Ipswich Suffolk

Dirty Limestone Kitchen Floor Deep Cleaned, Polished and Sealed in Ipswich

This limestone tiled floor was installed in the kitchen of a house on the outskirts of Ipswich in Suffolk. The protective sealer had broken down over the years with use, and the limestone was now unprotected and had lost its lustre, it was now absorbing dirt giving it a permanently dirty and dull appearance. Natural stone is porous and without the protection of a sealer its appearance will degrade as more dirt becomes ingrained in its pores.

Limestone Kitchen Floor Before Cleaning Ipswich

I visited site to have a look at the job, I carried out a test on a small sample area, which came up well; the client was happy to proceed with my quote so we arranged a date to complete the work later in the month.

Limestone Kitchen Floor Before Cleaning Ipswich

Cleaning a Limestone Tiled Kitchen Floor

To remove the ingrained dirt and improve the limestone I spent a day applying different grades of diamond encrusted floor pads, worked into the tiles with only water to help lubricate the scrubbing action. These pads are called burnishing pads and to up the pores of the stone so the dirt can be released you need to start with a coarse 400-grit pad.

Once the pad has been run over each tile at least three times the floor is rinsed with water and the soil is extracted with a wet vacuum. Before starting with the next pad in the series a strong dilution of Tile Doctor Pro Clean was run into the grout lines and scrubbed in by hand with a stiff brush before another round of rinsing and extracting.

The burnishing process was then repeated with a finer 800-grit pad and then a 1500-grit pad. The pads remove any remaining sealer and dirt and start building up the polish on the tile. At the end of the first day the floor was given a final rinse and dried with a wet vacuum. The floor was then left to dry off completely overnight.

Sealing a Limestone Tiled Kitchen Floor

Returning on the 2nd day I began by applying a very fine 3000 grit pad to close the pores up and add a nice subtle shine to the limestone. The floor was checked with the damp meter just to check it was dry enough to seal. The client wanted a slightly matt finish but wanted to ensure the natural colours of the floor came through with just a slight sheen. We selected to use Tile Doctor Colour Grow. It was then sealed with 3 coats, applying each coat after the previous one had soaked in and dried. It took 3 litres of sealer to fill up the stone with sealer which will now prevent dirt from becoming ingrained there.

Limestone Kitchen Floor After Cleaning Ipswich

The floor now has a nice, easy to maintain shine and the Colour Grow sealer provided a very durable finish. I recommended to the client to use Tile Doctor Neutral Tile Cleaner, this is pH neutral cleaner so nice and gentle on the floor, it will ensure the integrity of the newly applied sealer is not compromised.

Limestone Kitchen Floor After Cleaning Ipswich


Professional Restoration of a Limestone Tiled Kitchen in Suffolk

Dirty Limestone Kitchen Floor Deep Cleaned, Polished and Sealed in Ipswich Read More »

╳
Scroll to Top